Wednesday, 29 January 2014

January's Sewcial

The first ever Fabric HQ Sewcial has been and gone, and didn't we have a laugh! We dragged out the tables and sewing kit, laid out the cake, biscuits and jelly babies, put the kettle on in anticipation ... shared projects and finally got down to some sewing: there were people working on, dresses, jackets, applique, bean bags, quilts, cross stitch, kids toys and more - it was great!

We had a giggle about wonky darts, got to grips with tailor tacks, straight of grain, nap and notches and mused at the fact that you could once buy a pattern for a mere 40p!

Many a laugh was had as we wheeled out some ancient and erm, 'interesting' patterns as samples for our 'Getting your head around a commercial dressmaking pattern' session... and in all the excitement I forgot to take photos of what people were actually making!  So if you weren't there, you'll have to be content with this pic of the aforementioned ancient patterns.


... and no, Caroline, you don't get the hairstyle with the pattern on the left - I read the instructions and it's not included, I'm afraid.
 
 
If you fancy popping along to the next Sewcial, do get in touch. The next session's topics will be making your own bias binding and how to create a French seam. March 4th, 7.30pm, St Anne's Hall, Wendover.
 
See you there!
 

Monday, 27 January 2014

Oh what a few days we've have!


If you’ve tried to have a look at our website over the weekend then  you will know that it, erm... well it disappeared!

We are very pleased to say that it is now up and running again but given the recent troubles, we’ve decided to extend our sale until Sunday 2nd February . And to make it even better we’re giving 10% off all fabric only on top of our sale prices, until midnight on Tuesday 28th January.  Just a little incentive for you to come back and have a look. Just type the code ‘we are back’ at the checkout.

Thanks for sticking with us!

http://www.fabrichq.co.uk/

Saturday, 25 January 2014

Don't forget the first ever HQ Sewcial

Don't forget the first ever Fabric HQ Sewcial, this Tuesday 28th January at St Anne’s Hall, Wendover from 7.30pm.

This month we’ll spending a little time demystifying dressmaking patterns and then it’s make, make make! Bring along a project, pull up a chair and get busy. It’s going to be a corker.

See you there.


Wednesday, 15 January 2014

New Year New Workshops

So we're two weeks into 2014 now and to help you along with the good intentions fervour we all find ourselves caught up in at this time of year, here's Fabric HQ's new program of workshops for this spring!

The Fabric HQ Sewcial

Make what YOU want to make whilst building a portfolio of sewing knowhow. Part tuition, part sew-and-chat, the Sewcial is a great environment in which to meet up with friends and grow your sewing knowledge.

Monthly on a Tuesday night at St Anne’s Hall, Wendover 7.30pm to 9.30pm. No need to book - just show up!

28th Jan  Getting your head around a commercial dress making pattern £7


Ever wanted to tackle a commercial pattern in order to create your dream dress, only to be put off by baffling diagrams and confusing lingo? During our January session we’ll spend some time helping to give you the confidence to start afresh this year, unafraid to go forth into the wonderfully satisfying world of DIY couture! Plenty of time after for you to bring your own project to work on in a relaxed environment.

4th March  French Seams and Bias Binding £7


This month we will spend some time showing you how to make perfectly neat seams every time without the use of an expensive overlocker. We also show you how to create beautiful handmade bias binding as well as how to use it to give a professional finish to your project. Plenty of time after for you to bring your own project to work on in a relaxed environment.

Other Sewcial dates for your diary.... 1st April & 20th May


Workshops


We are so excited to be teaming up with Emma of Simple Pleasures Sewing School. We wanted someone we felt at home with to join us at HQ and Emma was the obvious choice. She is amazingly brilliant – a lovely woman who is as potty about fabric and sewing as we are so I’m sure you’ll all love her.


Fabric HQ and Simple Pleasures Sewing School combine to bring you a fantastic program of spring sewing! Tuesday nights at St Anne’s Hall, Wendover, 7.30pm to 10.30pm. Call Rae on 07761 957283, visit the website www.fabrichq.co.uk or email rae@fabrichq.co.uk to book your place & for more details.


18th February Workshop: Fully booked!

18th March  The Staple Dress £30 plus cost of pattern


A perfect beginner’s dress making project! Designed to be simple yet flattering. This dress has a lot of ease through the bust and hip, with elastic shirring at the waist to cinch it in. The waistline can be customized and adjusted up and down to accent the wearer’s natural waist. Choose between two hemlines, a classic straight hem or a more dramatic drop hem style, with optional side-seam pockets. Cute alone or belted, with flats, boots or heels, it’s a year-round wardrobe essential. 

Please note you will need to bring  along and know how to use your own sewing machine for this class. We strongly  recommend that you get it out for a test run shortly before the class so that you can make the most of your time at the workshop.
The Session includes instructions  to take away, tea coffee and cake, and your tuition. Please note that you will  need to bring your own fabric to make your dress.

15th April  Roman blinds part 1 & 22nd April Roman blinds part 2 £60 


During this two part workshop we’ll be learning how to make top-notch roman blinds, finished by hand like a professional. We’ll beaver away on a small sample to get our heads around the process of construction, and cover all the basics of how to measure up a window for a blind and the tricky business of pleat calculations. We’ll send you away armed with instructions to measure up your own chosen window at home, and calculate how much fabric you’ll need etc. When you return a week later we’ll go over your individual calculations for your blind and finish off the sample so that you’re all set to crack on with your own project at home. 

The Session includes use of a machine (but please bring your own if you wish), haberdashery, blind sundries for sample, instructions to take away, tea coffee and cake, and your tuition. Please note that you will need to bring 1m of your own fabric to make the blind sample. This a 2-parter, so you will need to sign up for PART II as well.


27th May  Bag with zip £30


Take your sewing up a gear and tackle a zip! Master some new techniques and go home with a gorgeous, unique bag to fill and all the skills you’ll need to whip up many more.

At this workshop you will learn:


·        Sewing a 3 dimensional shape
·        Inserting a zip
·        Inserting lining

So if you’re in the Wendover area, stop by at Fabric HQ at the Courtyard Gallery (behind Antiques at Wendover on the High Street) and find out more about The Sewcial and our new Workshop program. You can book the classes on the
website. Whatever your plans for 2014, make sure you make time to sew - oh and to tell us about what you're doing!

Happy 2014 : )


Tuesday, 24 December 2013

Fabric HQ Sale Now On!

Happy Christmas to all our lovely customers.  May your stocking be full of scrummy fabric stacks!  If it's not then have a look at our ONLINE SALE which is now live!  Huge savings are to be had on almost 200 designs .... while stocks last!
http://www.fabrichq.co.uk/Sale.aspx
 Happy Christmas everyone! 


Wednesday, 18 December 2013

On the twelth day of Christmas...


Charlie Deighton gave to us ...

Charlie's Christmas Angels!


See our new blog at http://www.fabrichq.co.uk/blogs/fabrichq for all our lovely Christmas makes from 2013 plus new ones for 2014!

Tuesday, 10 December 2013

On the eleventh day of Christmas ...

We gave to the kids .....

.... a pencil wrap!


You can see this tutorial, as well as many more on our new blog at http://www.fabrichq.co.uk/blogs/fabrichq

Wednesday, 20 November 2013

On the eighth day of Christmas ...

... we made with our kids, a Tree-o of Christmas Trees!


http://www.fabrichq.co.uk/Christmas.aspx


http://www.fabrichq.co.uk/Christmas.aspx

http://www.fabrichq.co.uk/Christmas.aspx


http://www.fabrichq.co.uk/Christmas.aspx


You can see this tutorial, as well as many more on our new blog!

Wednesday, 13 November 2013

On the seventh day of Christmas ...

... Katy Jones gave to us ....
 
A Christmas Stocking!
 
 
Well we couldn't do a Christmas crafting series without one, now could we?  Katy very kindly offered this little gem of a tutorial, the perfect stocking for hanging by the fireside if you happen to have one - or at the foot of your bed if, like me, you don't (one day....)  I don't think Santa is fussed either way but he is guaranteed to stop for a second to admire your handiwork if you give this little lovely a go.
 
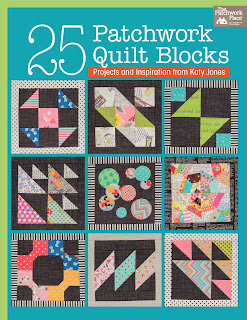
Katy is the co-founder of Fat Quarterly magazine, prolific (and often hilarious) blogger and author of 25 Patchwork Quilt Blocks which was published earlier this year and has received rave reviews. 
 
http://www.amazon.com/25-Patchwork-Quilt-Blocks-Inspiration/dp/160468285X/ref=cm_cr_pr_product_top
If you love her blog, Monkey Do (which, if you have read it, you will do!) then you must get this book - plain and simple.
 
Katy also contributed this cool cotton reels quilt project to the very first edition of the new Love Patchwork and Quilting magazine.  What - not got your subscription yet!?  No worries: you can get the first 3 issues for a fiver by following the link here : ) Katy's book, a subscription to LP&Q mag and a stack or two of fabric would all make excellent fillers for the stocking you are about to make, methinks? Drop a few hints, why don't you?
 
http://www.myfavouritemagazines.co.uk/stitch-craft/love-patchwork-and-quilting-magazine-subscription/
 
 
Right-o over to Katy ...
 
 
For my Christmas project I decided to make a large Christmas stocking in the shape of Santa's boot sock. It's a really simple design and doesn't need any templates plus it ends up as a nice big stocking - which means more presents from Santa!

I made chevron shapes from half square triangles, my blocks finish at 5.5" (before sewing them into my stocking) - but you could easily use simple patchwork and cut your fabric into 5.5" squares instead of making all those half square triangles. My plan is to make a second version using the same fabrics (Kate Spain in from the cold) but squares instead.


You will need;
a Kate Spain in from the cold FQ stack (or 4 fat quarters of fabric)
a dinner or side plate (for making the curved edges of your stocking)
short length of ribbon (for the hanging loop)

Firstly either cut 14 5.5" squares from your fabrics for a plain patchwork version, or make 14 chevron blocks from half square triangles that will finish at 5.5" (3" half square triangle units - 4 units per chevron block). You can find a really good and thorough tutorial for half square triangles at about quilting.


Lay them out in rows like the picture below....


Sew the rows together and press all of your seams nice and flat. Press the red FQ and layer up underneath the patchwork stocking shape. Cut the half metre of green lining fabric and place that underneath too - so that all of your fabrics are neatly stacked together.

Now take the plate and use the curved edge to round off the heel and the toe section of the stocking. You don't want to make this too severe - just a nice curve. I used a frixion pen that will disappear with a hot iron, but you could use chalk or a pencil. Anything that will disappear.


Carefully cut through all 4 layers of fabric so that your stocking looks like the picture below....


Now pin the back of the stocking to the patchwork front - laying them right sides together, and sew around using a good 1/4"seam allowance making sure you leave the top open (just like a sock!)

Do the same with the lining fabric - but this time leave a hand width gap in the bottom or about half way down one side for turning later.


Using scissors, clip notches into the curved bits. Be careful not to go through the stitches!


Turn your outside stocking right way out and press. You can now add a hanging loop, a short length of ribbon pinned to the top of the stocking. When you pin it, make sure it's pointing downwards - like in the picture!


A close up....


Now carefully place the outside of the stocking into the lining so that right sides are facing. ensure your pinned loop is still pointing down and nice and flat. Poke the toe of the stocking into the toe of the lining (remember your lining is still wrong way out - the stitching is on the outside. The patchwork part of the stocking is right way out but inside the lining!) Pin around the top of the layers, and sew together using a good 1/4" seam allowance.


This is the fun bit - pull the patchwork stocking out through the opening in the bottom or side of the lining, and once it's all out, poke the lining into the stocking and slip stitch or machine stitch the opening closed.

Remove the pin from the hanging loop and if you like, top stitch around the top of the stocking. Give it all a good press


Now you can hang your stocking up and wait for Santa to come and fill it!


Thanks Katy - a really beautiful stocking. Be sure to check out Katy's blog for more quilting delights and to pop back here for the next installation of our Christmas project countdown!

Wednesday, 6 November 2013

On the sixth day of Christmas ...

... we made for ourselves some Christmas Bunting.

Wow - half was through the Christmas Makes blog series - how did THAT happen???

Now we're the other side of Halloween and Bonfire Night it really is time to get those Christmas projects on the go - that is if you want to avoid having to adopt the mantra 'Keep Calm and Make It For NEXT Christmas'.

A simple one today - a couple of slightly different takes on bunting....


A paper and ribbon version that is a great project to make up with kids ...


and a scallop edged bunting that can be used as a Christmas garland to hang high or decorate your tree with.  If you're looking for a tutorial on how to make bunting, check out HQ's tutorial over at Tribemag.  In fact check out Tribemag ANYWAY for some brilliant family inspired ideas.  If you are based in or near Devon or plan to stay there anytime soon then it really is THE essential family magazine - helping you discover the delights of Devon as well as giving you loads of kid friendly stuff to do at home or when you're out and about.
 

Paper and Ribbon Bunting - ideal for keeping little fingers busy!

 
Inspired by the very first of HQ's Christmas tutorial series by Sue of Liberty Rose, I went out and got me some sheet music to turn into her beautiful Christmas Calendar.  I couldn't resist then turning some of it into this ditsy mini bunting.  This is a perfect project to do with kids - you just need some pretty paper, scissors and ribbon, et voila!  I've sewn the buttons on but if you use fabric glue to secure the ribbon then the kids could even stick these on.  A fab project to keep the kids amused on a rainy late autumnal afternoon (yes that's what they're predicting for this weekend, folks!)


I used a mixture of different sized white and cream buttons but you could use all sorts of Christmassy greens and reds.  I think these little shell buttons look really gorgeous.
 
 
You could make metres of this and wrap it around your Christmas tree ...

 
... but seeing as I haven't got my Christmas tree up yet, some nicey-drapey-over-thingies is the best way to show this off, methinks.


Scalloped Bunting

 
This is a break from the traditional pointy bunting we all know and love.  Again my initial thought was to use it as an alternative to tinsel round the tree, but it looks equally lovely draped along shelves ....


... or wrapped around beams. I used an Espirit De Noel Moda Charm Pack for these for a traditional Victorian Christmas feel but the Wintergreen or Midwinters Red would look equally as fab. You'd get a ton of this from a whole charm pack. You could go more modern with this and use something like Kate Spain's chevron-tastic Tree Line Holly Berry ...
 
http://www.fabrichq.co.uk/2712612%20MO025%20Tree%20Line%20Holly%20Berry.aspx
 
... or Jolly Snow
 
http://www.fabrichq.co.uk/27123%2013%20MO023%20Jolly%20Snow.aspx
 
It's really simple to make.  find a tea cup or something else that's round and fits onto your charm pack square.  Draw around it and cut out a circle with pinking shears to stop the edges fraying.  Cut your circles in half and then stitch into your binding as with normal bunting.  Carry on until you have the desired length and then you're done!


Check out the Tribemag article for more fun bunting ideas - especially for kid friendly cardboard and hole punch bunting.  Ooo the possibilities are endless!
 
Lots of you have been getting organised and choosing your Christmas fabrics.  Have a look at our selection to see what you could be making into Christmas bunting.
 
Have a lovely week, whatever you're making and we'll see you back again next week for our next Christmas make!


Wednesday, 30 October 2013

On the fifth day of Christmas ....

Lisa at Sew Blue Poppy gave to me .....

a fabric Christmas card tutorial
 
https://www.facebook.com/SewBluePoppy

Lisa creates beautiful handmade fabric gifts using free hand machine embroidery.
 
From personalised bunting and egg cosies ....

https://www.facebook.com/SewBluePoppyhttps://www.facebook.com/SewBluePoppy
 
... to make-up bags and cushions.   

https://www.facebook.com/SewBluePoppyhttps://www.facebook.com/SewBluePoppy
 
Lisa's sense of fun and colour shine through in all of her designs. If you would like to find out more or commission a piece from this very talented lady, come see some of her work at Fabric HQ, The Barn Courtyard, Wendover or contact her via her facebook page

https://www.facebook.com/SewBluePoppyhttps://www.facebook.com/SewBluePoppy

 
In this tutorial she shows you how to use this technique to make your very own Christmas cards that are guaranteed to take pride of place on the recipient's mantelpiece this holiday season.


1.  Firstly, you will need some cardstock. You can either buy large sheets of card and cut to size or you can buy ready cut packs of cards with envelopes.

I am using 5x5 inch cream ready cut card.
2.  Now you will need to choose some backing fabric. This is the fabric onto which you will sew your appliqué design and then sew to your card.
 
I have chosen some lovely natural linen.
You will need to cut a square of this fabric slightly smaller than the size of your card. In my case, I have cut out a 4x4 inch square.
 
3.  Next, it’s all about your appliqué design. Choose some lovely Christmassy fabric and cut out your shape. I drew my design freehand on some tracing paper first and once I was happy with the shape, transferred this to the fabric and carefully cut it out.
4.  Next comes some wonderful free hand machine embroidery.  In order to set your machine up for free hand machine embroidery, you must remember these important rules;

·         Drop the feed dog on your machine. You want your fabric to be able to move freely under the needle so make sure that this is dropped below the metal plate on your sewing machine.

·         Take off your sewing foot. If you have an embroidery foot with your sewing machine, then attach this now. Otherwise you can use the machine without a foot but please please don’t sew your fingers! Take great care to keep your fingers away from the needle.

·         Lastly, change your stitch length to zero and you are ready to go.

Position your appliqué fabric on top of your square and pin it in place. As the square of fabric is too small to use an embroidery hoop I find that pinning a piece of paper underneath the fabric square helps to stabilise the fabric while you sew.
Sew all the way around the edge of your appliqué fabric.  Don’t worry if you have some wobbly lines, this is the joy of machine embroidery and it will make each card you make unique. 
 
5.  Before you do anything further, remember to set your machine back up for normal sewing. Feed dog back in the up position, stitch length returned to normal and sewing foot back onto your machine.
 
6.  Next add any embellishments. I have chosen a piece of lace, a vintage button and some raffia but the options are endless. Hand or machine sew these in place before moving onto the next step.
7.  Now it is time to sew your fabric square onto your card. I used a straight stitch but a zigzag stitch would work well too. Sew around the outside of your fabric square onto the front of your card and trim any loose ends.

8.  Ta da! Your lovely handmade fabric Christmas card is complete. Now all you need to do is decide who the lucky recipient is going to be and spread a little Christmas joy.
 
Thank you so much Lisa for this beautiful tutorial.  Come back next Wednesday for the next of our great festive gift ideas!